INTRODUCTION
You might know JIRA Software already and might run it on AWS or on a physical server somehwere in your datacenter. When it comes to high load JIRA instances you might note that JIRA can become slow because it is just one Java-Application running in one Application-Server. And you can scale up and throw RAM at it all you want, at some point you need to scale out.

Therefore Atlassian introduced JIRA Data Center which consists of multiple Application-Server nodes running JIRA. A shared Database, a shared filesystem and a sticky session loadbalancer.
This blogpost aims to setup a local staging environment with virtual machines to be able to test your JIRA Plugins in a real JIRA Data Center Setup. Knowing that you could have a simpler development Setup of JIRA Data Center I really like this full fledged approach since it gives you a deeper understanding of how exactly JIRA Data Center works internally. Also this blogpost should be seen as an introduction to the followup bloposts that deal with Ansible and provisioning JIRA Data Center on AWS.
PREREQUISITES
- You will need a machine with enough RAM (at best 16 GB) to run three Virtual Machines.
- You need Parallels Desktop.
- You need a downloaded version of JIRA Software for Linux 64 Bit.
- You need an iso-file of Ubuntu Server 16.04.1 LTS.
- Have pgAdmin installed.
NETWORK DIAGRAM
We want to Setup JIRA Data Center with two application nodes and one shared server running the database, loadbalancer and shared filesystem.
I will use some domains for my machines that point to local network addresses in my local network. The local network has its gateway on 192.168.178.1 and the subnet mask is 255.255.255.0. If you have a DNS Server you should also use Domains since this will lead to a more understandable setup.
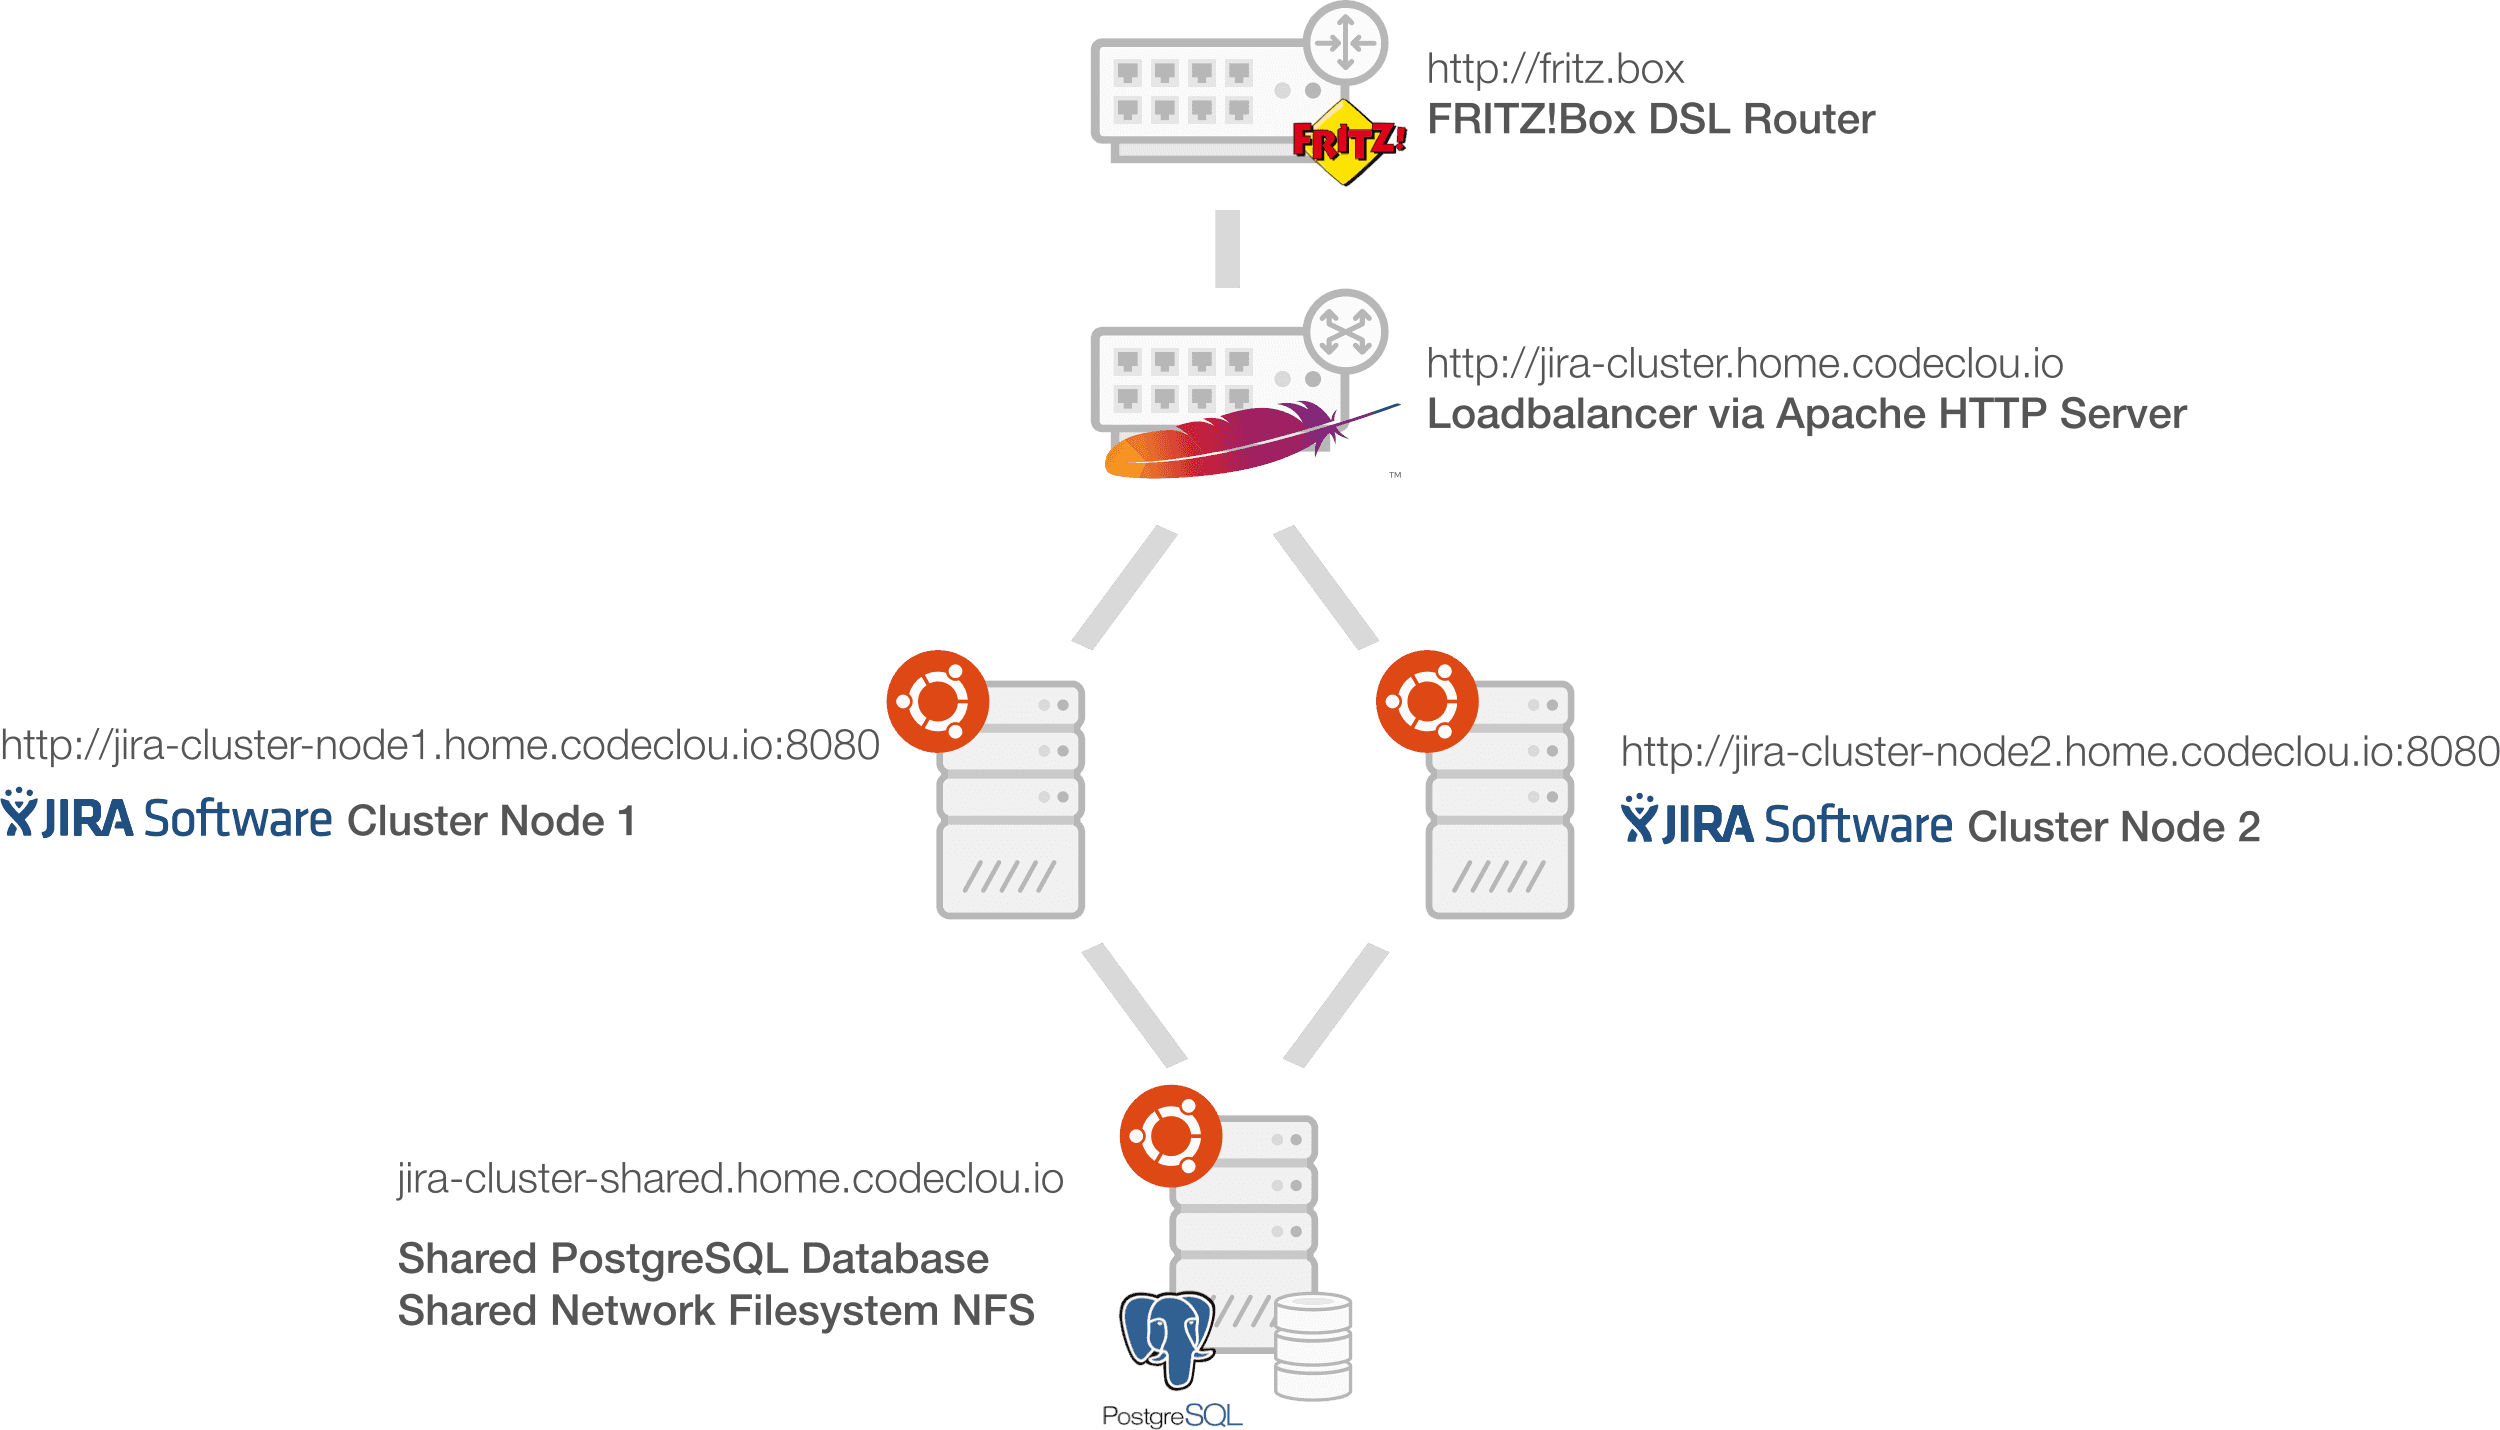
jira-cluster.home.mypage.io
- Ip: 192.168.178.5
- Description: Cluster BaseURL for JIRA Data Center Cluster points to Shared Host Virtual Machine
jira-cluster-shared.home.mypage.io
- Ip: 192.168.178.5
- Description: Shared Host Virtual Machine running shared filesystem, shared database and loadbalancer
jira-cluster-node1.home.mypage.io
- Ip: 192.168.178.12
- Description: Cluster Node 1 Virtual Machine running an instance of JIRA Software
jira-cluster-node2.home.mypage.io
- Ip: 192.168.178.13
- Description: Cluster Node 2 Virtual Machine running an instance of JIRA Software
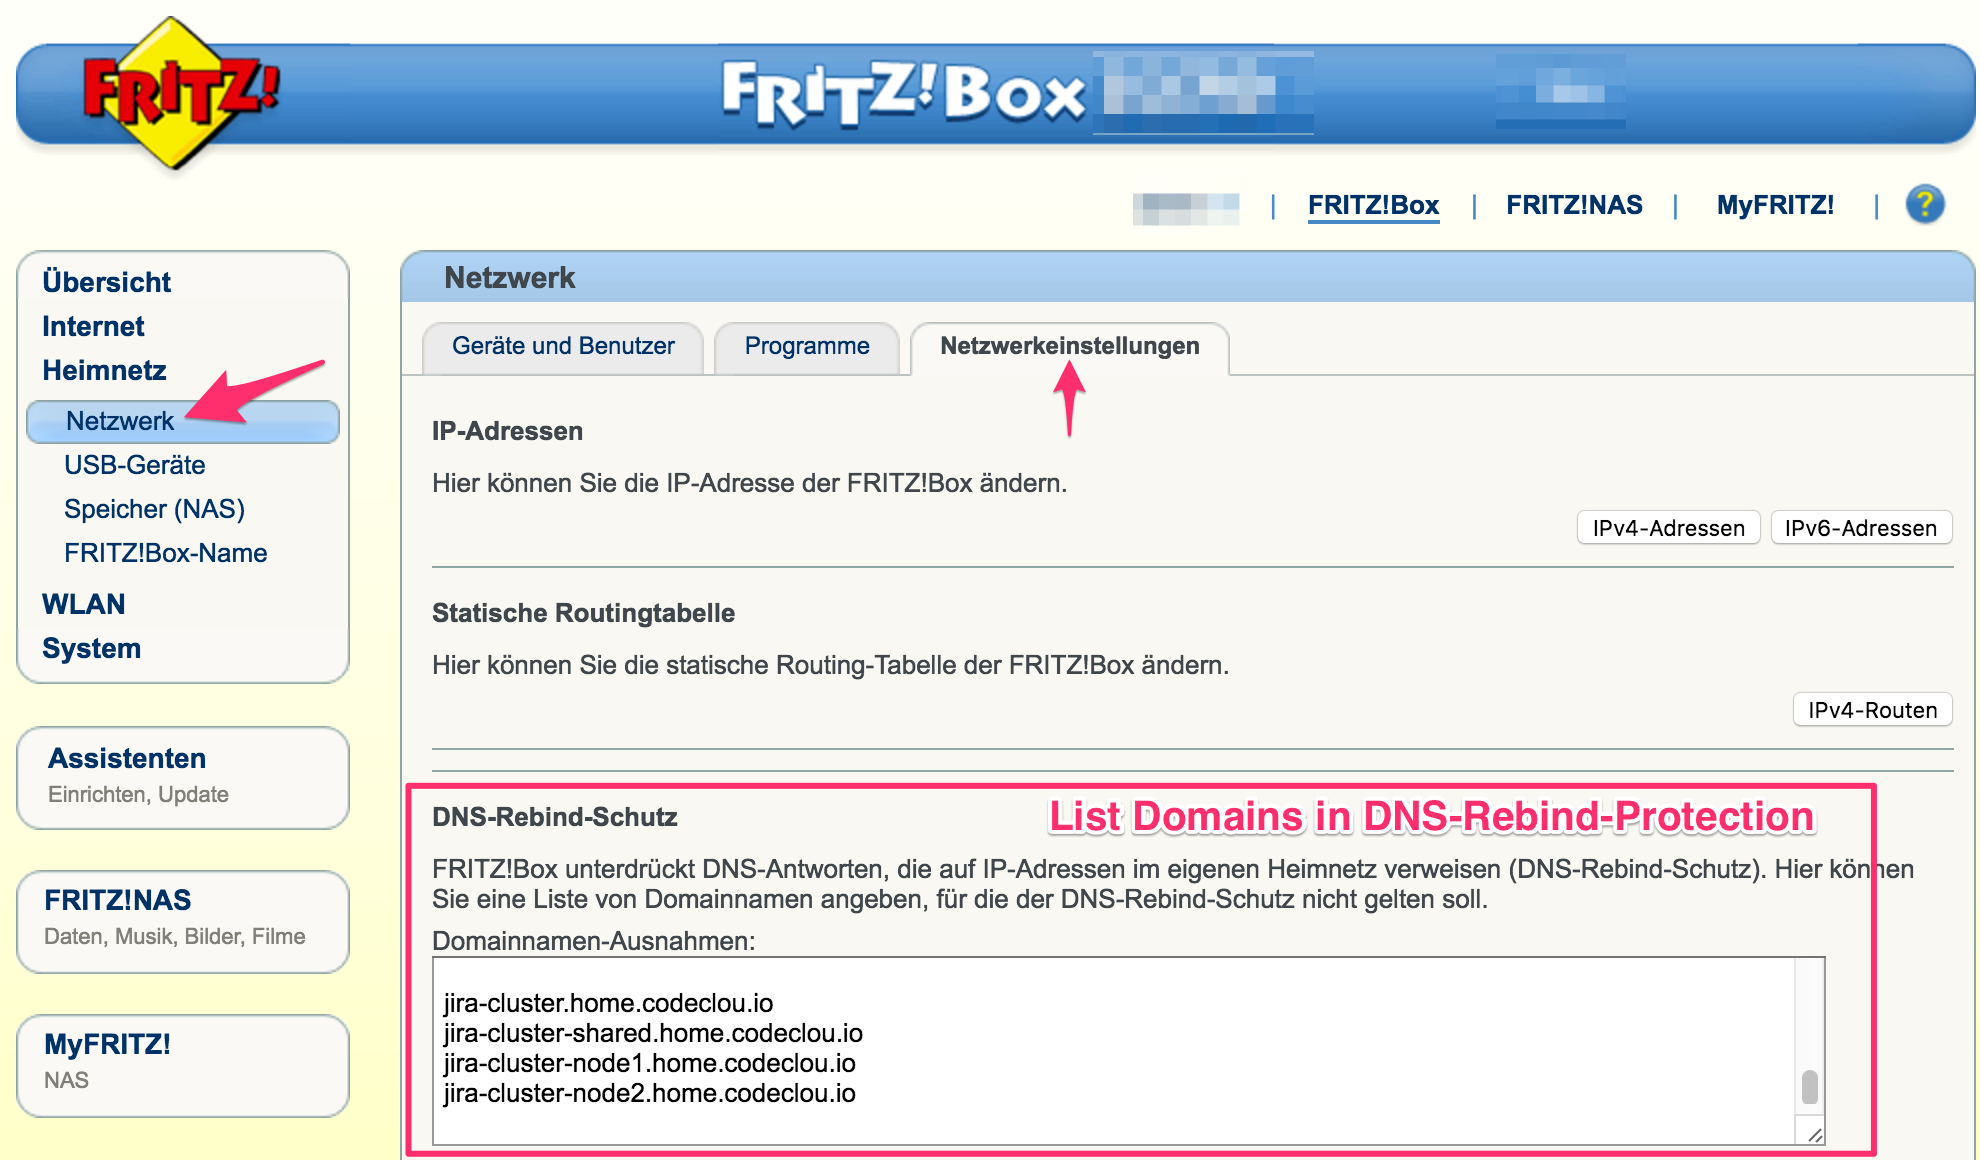
DNS Rebind Protection in your Router
A note to FRITZ!Box users. You need to allow your Domains to point to local network IPs like this.
PART I: CREATING AN UBUNTU BASE VIRTUAL MACHINE IMAGE
You can either use a predefined Virtual Machine Image or create it yourself. We need the following basic Ubuntu System as Virtual Machine.
- Ubuntu Server 16.04.1 LTS
- 3 GB RAM
- 16 GB Harddrive
- Bridged Networking
- OpenSSH Server installed
Here you can see some screenshots of ubuntu base install with Parallels Desktop:

After you have installed ubuntu shutdown the machine (not only hibernate) so that we can clone it in the next installation steps.
PART II: SETUP SHARED HOST
First of all open the Prallels Desktop Manager and clone the Ubuntu Base System we created earlier. Call the new System jira-cluster-shared and start it up and configure the IP Address and Hostname and restart.
Static IP Config
shell:vim /etc/network/interfaces
github:95898fa8fd8ab223801a8390bf805ab8
Hostname
shell:vim /etc/hostname
github:e66f84b4a1a57f2c71a96ea94ae99969
Restart the system so that the changes take effect.
shell:shutdown -r now
Ok now we can connect via SSH from our Host Computer.
shell:ssh clouless@jira-cluster-shared.home.mypage.io
Install and Configure PostgreSQL Server
shell:sudo apt-get install postgresql postgresql-contrib
Create the database user jiracluster and enter jiracluster as password as well.
shell:sudo -u postgres createuser -P -d jiracluster
Create the jiracluster database.
shell:sudo -u postgres createdb -O jiracluster jiracluster
Open network connections for PostgreSQL server.
shell:sudo vim /etc/postgresql/9.5/main/postgresql.conf
Find listen_addresses and change the line so that the server listens to all network interfaces.
github:61376372ab0927baea2e91985bab494d
shell:sudo vim /etc/postgresql/9.5/main/pg_hba.conf
Add a line to allow all incoming IPs to connect.
github:70b51cdebb1d4d547db58e9cad9ae5a4
Restart the PostgreSQL server.
shell:sudo service postgresql restart
Install and Configure NFS Server
Install the nfs server.
shell:sudo apt install nfs-kernel-server
Create a non privileged user called atlassian we will map all created files of the NFS Clients to.
shell:sudo adduser --gecos "" --no-create-home --disabled-login --disabled-password --shell /bin/false atlassian
Note down the user-id and group-id because you will need it later in the /etc/exports.

Create the shared folder that is to be exported.
shell:sudo mkdir /opt/atlassian-cluster-shared-nfs
Change the export config to actually export the shared folder to all network members and use the user-id and group-id of the atlassian user.
shell:sudo vim /etc/exports
github:40f1fff8cd9ef1c68bdbbfae492f1538
Start the nfs server.
shell:sudo /etc/init.d/nfs-kernel-server start
Just to be safe change permissions of shared folder.
shell:sudo chown -R atlassian:atlassian /opt/atlassian-cluster-shared-nfs
Install and Configure Apache 2 Webserver as Sticky Session Loadbalancer
Ok first of all I normally use nginx for all my things. But sadly the sticky-session-cookie-thingy is something nginx offers only in their pro version which is a little expensive if you don’t need the professional support. And yes I have seen the mod which I could manually compile into my nginx, but we do not do that - and I will not write an essay here about why not. So we are back to good old Apache HTTP Server which does the job fine.
Therefore we first install the server.
shell:sudo apt-get install apache2
Enable mods.
shell:sudo a2enmod headers proxy_balancer proxy_http proxy lbmethod_byrequests slotmem_shm
Delete the default site.
shell:sudo rm /etc/apache2/sites-enabled/000*
Create a config file for our loadbalancer config.
shell:sudo vim /etc/apache2/sites-available/001-jira-cluster.home.mypage.io.conf
github:ef8e03dfb1af887ba43c4d082fa28470
And now enable the site.
shell:sudo a2ensite 001-jira-cluster.home.mypage.io.conf
Lastly restart the http server.
shell:sudo service apache2 reload
PART III: SETUP JIRA CLUSTER NODE 1
Now open the Prallels Desktop Manager and clone the Ubuntu Base System we created earlier. Call the new System jira-cluster-node1 and start it up and configure the IP Address and Hostname and restart.
Static IP Config
shell:vim /etc/network/interfaces
github:3bb0c26a2c9c3fb8307f0654087fdac9
Hostname
shell:vim /etc/hostname
github:f9dc68702e358a1e651943d93f9ed53c
shell:shutdown -r now
Ok now we can connect via SSH from our Host Computer.
shell:ssh clouless@jira-cluster-node1.home.mypage.io
Before we install JIRA we need to configure the NFS Client and mount the Shared Directory. Therefore open /etc/fstab and add a line with the mount instructions.
shell:sudo vim /etc/fstab
github:189c98369b8b69eb5127b530a7fd63a0
Now we install the NFS Client.
shell:sudo apt install nfs-common
After the installation is done we create the mount point and mount the NFS Shared directory.
shell:sudo mkdir /opt/atlassian-cluster-shared-nfs
shell:sudo mount /opt/atlassian-cluster-shared-nfs
Alright. Now the shared dir should be mounted and you should be able to create files in it and see them also appear on the jira-shared instance.
Open another terminal and copy JIRA Software installer to node1 via scp
shell:scp ~/Downloads/atlassian-jira-software-7.2.0-x64.bin clouless@jira-cluster-node1.home.mypage.io:~/
Now switch back to the previous terminal connected to the shared host via ssh and start the JIRA Installation
shell:chmod +x atlassian-jira-software-7.2.0-x64.bin && sudo ./atlassian-jira-software-7.2.0-x64.bin
You can see the whole installation in the video above. Open http://jira-cluster-node1.home.mypage.io:8080 and the browser and complete the installation. Here are the important things you need to do during setup wizard:
- Use a Trial JIRA Software Data Center License from my.atlassian.com (you need to have an account)
- Select Production Installation with PostgreSQL Database and use jira-shared.home.mypage.io as hostname and jiracluster as databasename, databaseuser and databasepassword.
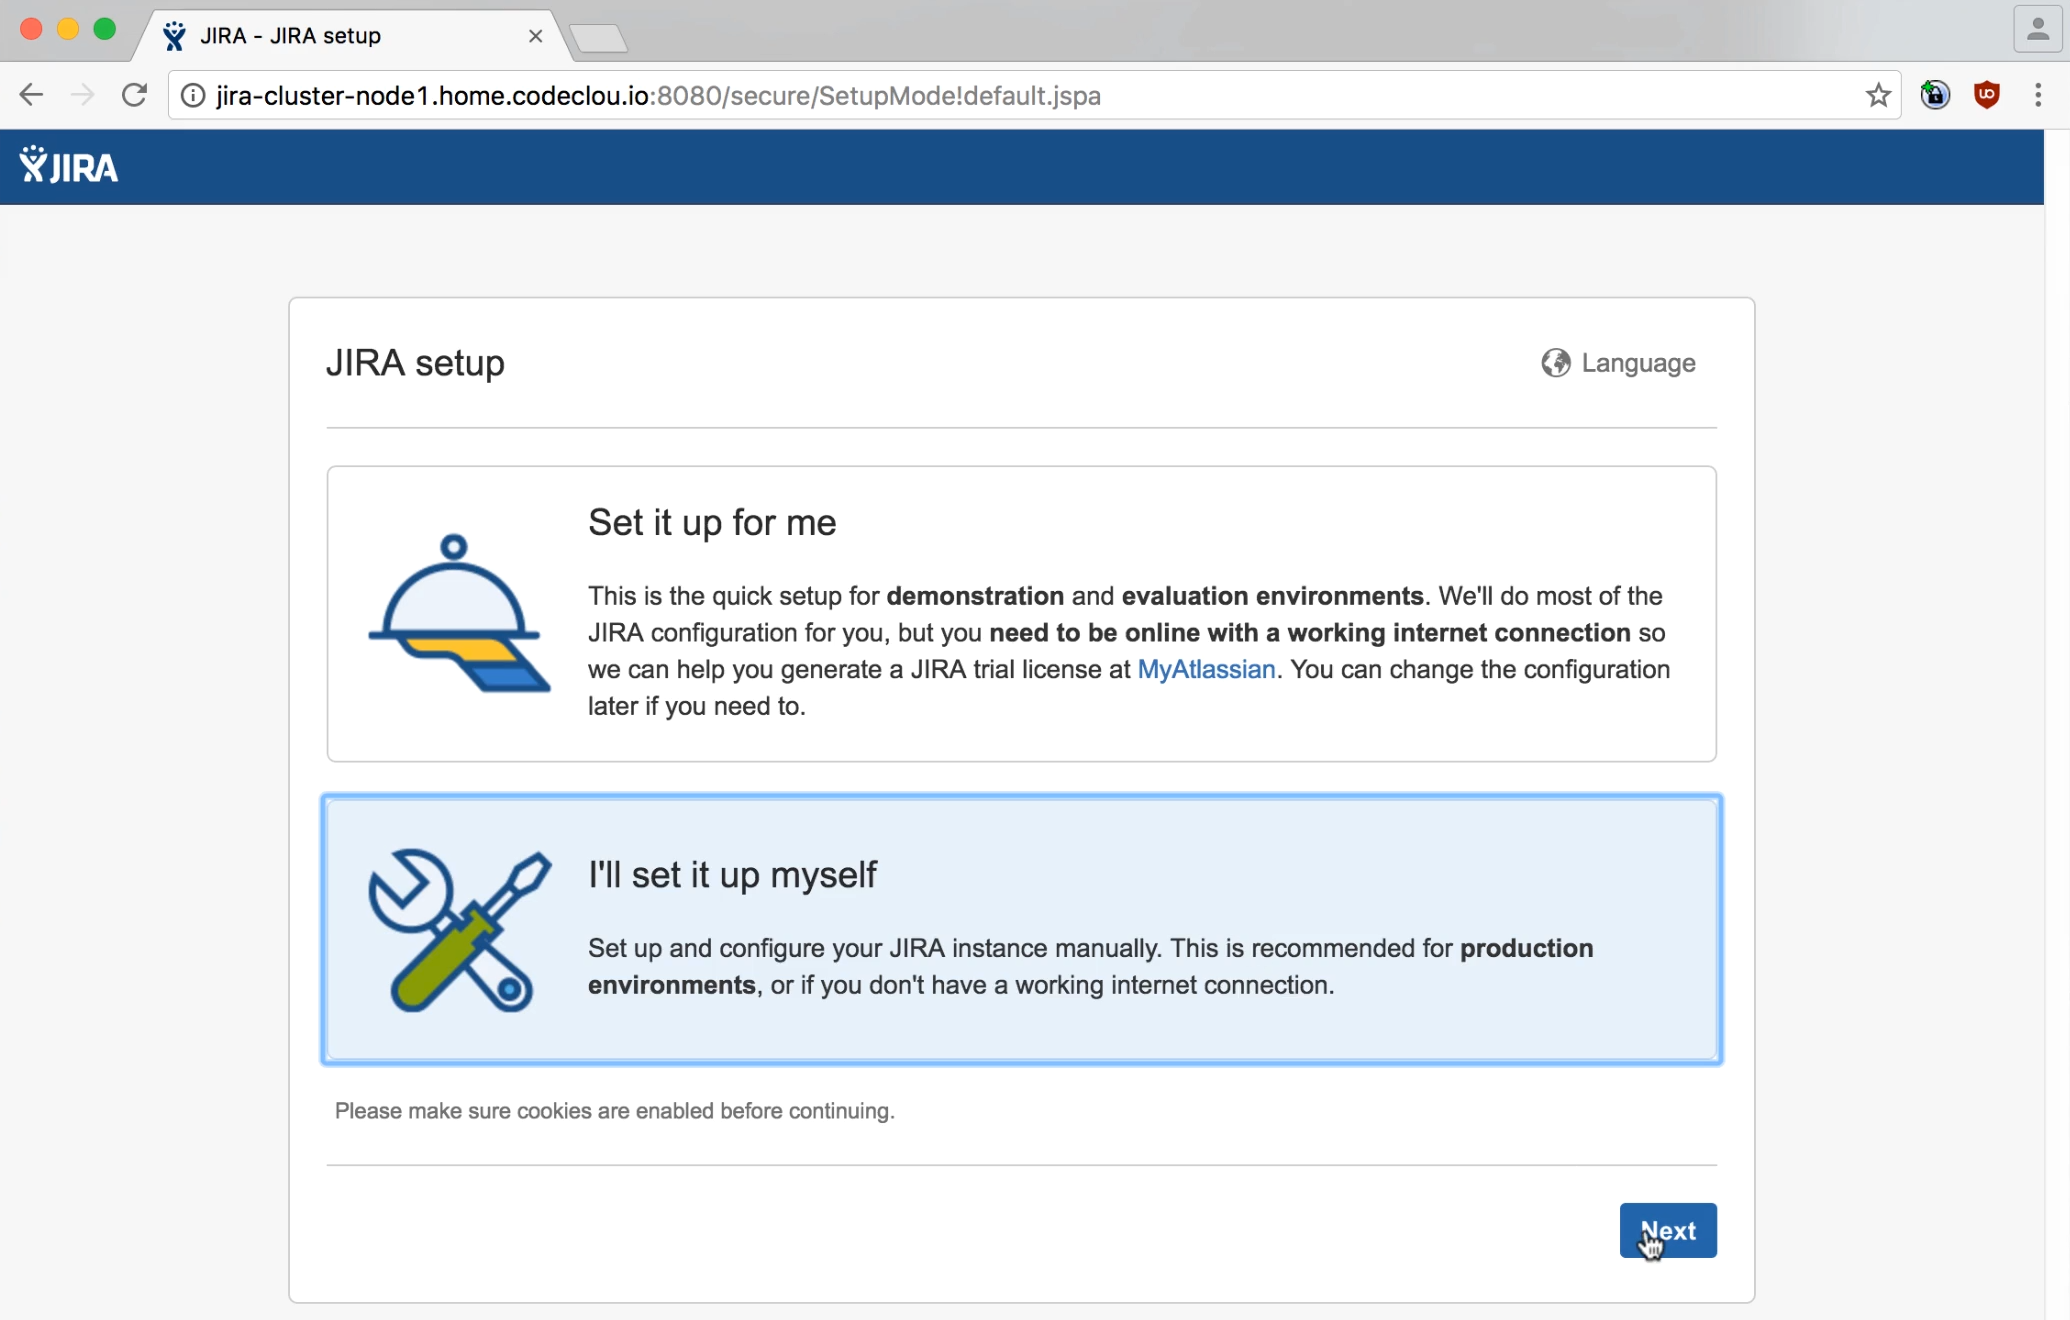
Complete the installation.
Now we start the actual JIRA Data Center Cluster configuration.
We first need to shutdown JIRA.
shell:sudo /etc/init.d/jira stop
Next we create the actual shared JIRA home and change permissions
shell:sudo mkdir /opt/atlassian-cluster-shared-nfs/shared-jira-home/
And we do not need to care about permissions of the shared home since it will all be mapped by the server. You might need to say chmod 777 -R on the jira-shared-cluster on this folder when you get permission problems.
Alright now that everything is setup we need to create the cluster.properties and define the nodename and the shared home directory.
shell:sudo vim /var/atlassian/application-data/jira/cluster.properties
github:4e13813d73ca03c596a9c2bbeffb2389
And now we need to copy some folders of the local JIRA home directory to the shared one.
shell:cp -R /var/atlassian/application-data/jira/{data,plugins,logos,import,export} /opt/atlassian-cluster-shared-nfs/shared-jira-home/
Let’s start JIRA again and see what happens.
shell:sudo /etc/init.d/jira start
Once JIRA has started up and we vist the Dashboard we can see the node-name show up in the footer.

In the JIRA Administration System Info clustering shows as activated.

Alright - since everything works so far we completely shutdown the system to be able to clone it again.
shell:sudo shutdown -h now
PART IV: SETUP JIRA CLUSTER NODE 2 AND STARTUP THE CLUSTER
Now open the Prallels Desktop Manager and clone jira-cluster-node1 we created earlier. Call the new System jira-cluster-node2 and start it up and configure the IP Address and Hostname.
Change the IP to 192.168.178.13 in /etc/network/interfaces and the hostname in /etc/hostname to jira-cluster-node2 like you did it during the node1 setup but do not restart just yet.
Now change the cluster.properties to
shell:sudo vim /var/atlassian/application-data/jira/cluster.properties
github:ab595dd1afab667ce7f2aed426e6aa83
And now restart and stop JIRA once the instance is started up
shell:sudo shutdown -r now
shell:sudo /etc/init.d/jira stop
Now startup jira-cluster-node1 and soon after start JIRA on node2 again.
shell:sudo /etc/init.d/jira start
Now you should be able to open http://jira-cluster.home.mypage.io/ and see yourself bound to either node1 or node2.
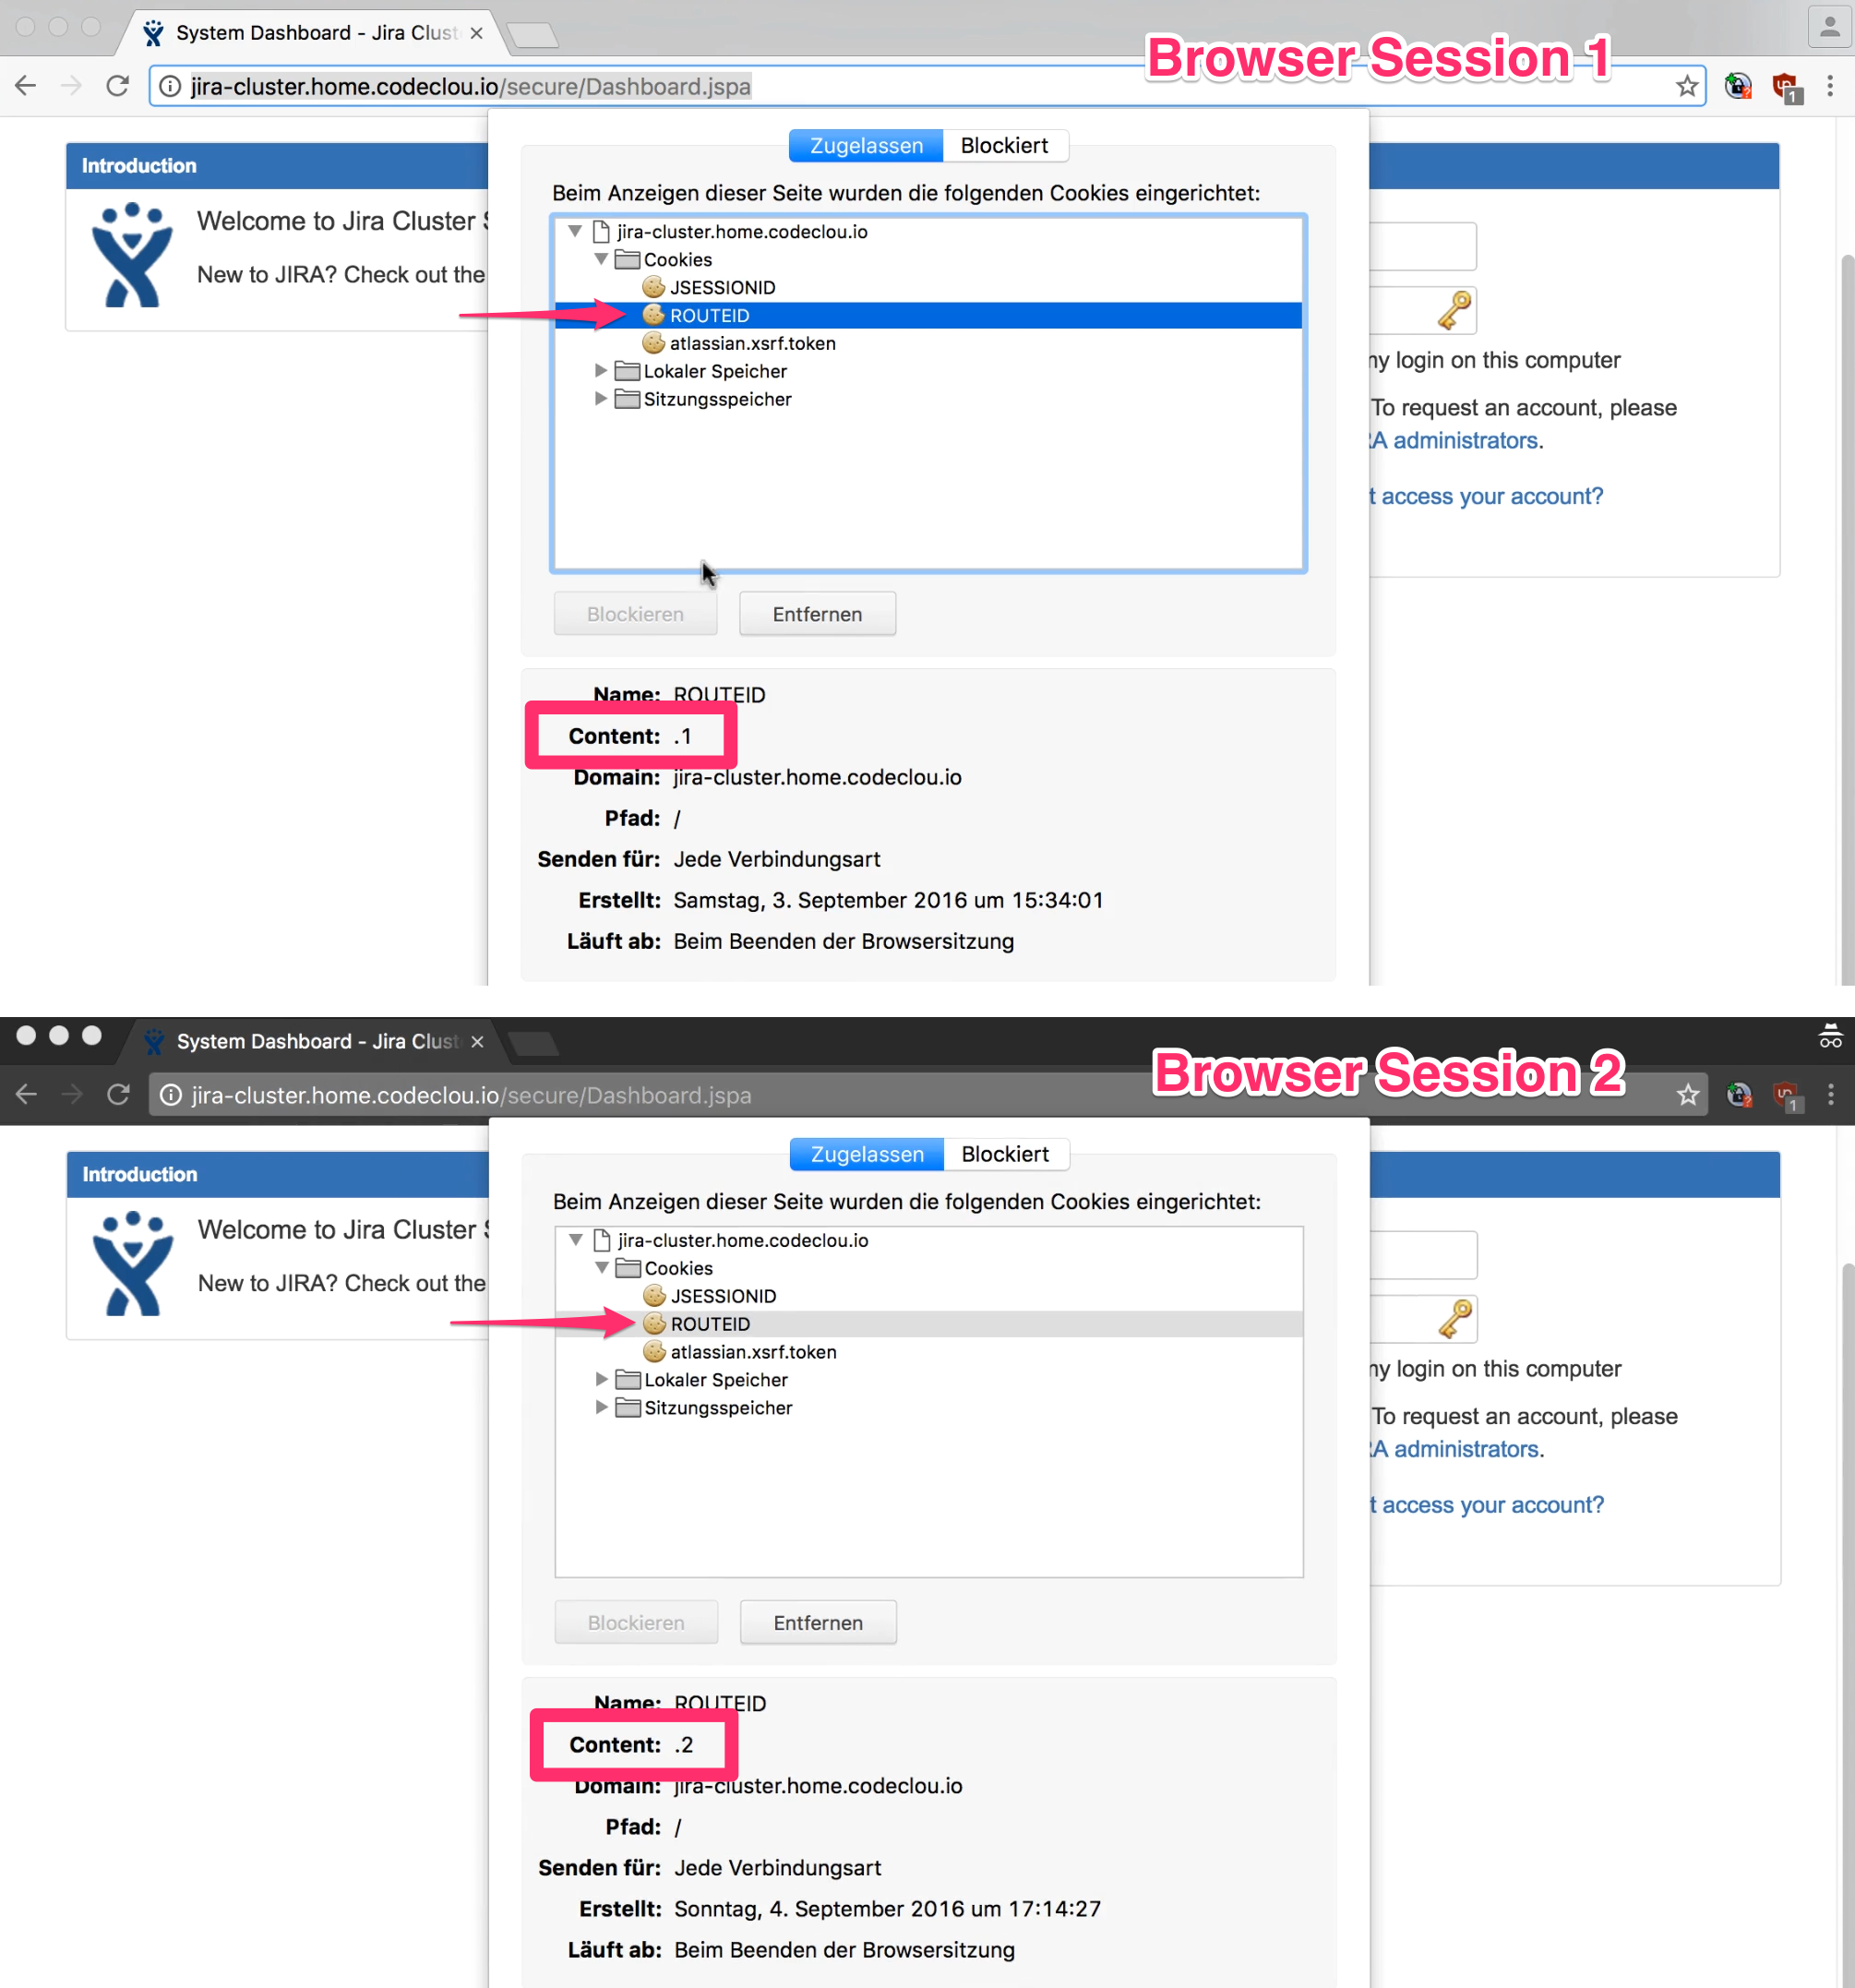
Your JIRA Data Center cluster is working now and you can upload your developed Plugins via the UPM as JAR-files and test them in a real cluster setup.
If you need help with JIRA, Confluence or any other Atlassian product we offer Atlassian Experts Services. We are experienced in the Setup of Atlassian Products in your own datacenter and on AWS. We also offer consulting via webmeeting worldwide. Feel free to contact us via the contact form below.